Cinco de Mayo is a fun day to be living in LA. A lot of people go out to celebrate, making the bar and restaurant scene really crazy. I sometimes think that Cinco in LA is similar to being in Boston for St. Patrick’s Day. Unfortunately, this Mexican holiday has also turned into a just another day to go out drinking, and few people know what the holiday actually means.
I can’t tell you how many times I’ve heard someone refer to Cinco de Mayo as a celebration of Mexican Independence, which is just silly! When Kaia and I set out to make dinner celebrating Cinco, I wanted to make sure she knew why we would celebrate. The day is a celebration of the Mexico winning the Franco/Mexican Battle at Puebla. The biggest celebrations occur in Puebla Mexico (where the battle took place). It is NOT to celebrate Mexican Independence – Mexico had already won their independence from Spain.
Kaia and I have plans to travel – we want to further explore the relationships between family and food in other parts of the world. I want to share other food experiences with Kaia and let begin to understand how other cultures pair family and food. Unless someone out there wants to start sending us on new journeys, we will have to do it from afar and stick to our local adventures.
Okay, let’s get down to cooking. I don’t want to brag (I’m going to anyhow), but Kaia is an amazing tortilla maker! Sure, we could buy tortillas already made at the store, but I thought it would be really fun if we could make them together and talk about what Cinco really means.

We don’t have a tortilla press, but that’s okay! One of our mantras is to use what we have and see if we can make it work, and work it did! To replace the tortillas press, Kaia used the bottom of one of our Calphalon pans.
Because the battle happened in Puebla and now the biggest celebrations in Mexico happen in Puebla, we wanted to make something that was relative to the food you might eat in Puebla.
Puebla-style food traditionally uses a lot of mole sauces. Mole, when made correctly, is really labor intensive and the process has a lot of steps. I love enchiladas with mole, but Kaia and I didn’t have the time to make a traditional mole. Plus Kaia has recently developed this weird complex about enchiladas. This is the only time I have ever questioned whether or not she is my child. And what’s more, there’s absolutely no reason she doesn’t like them… She just doesn’t. And so enchiladas were out.
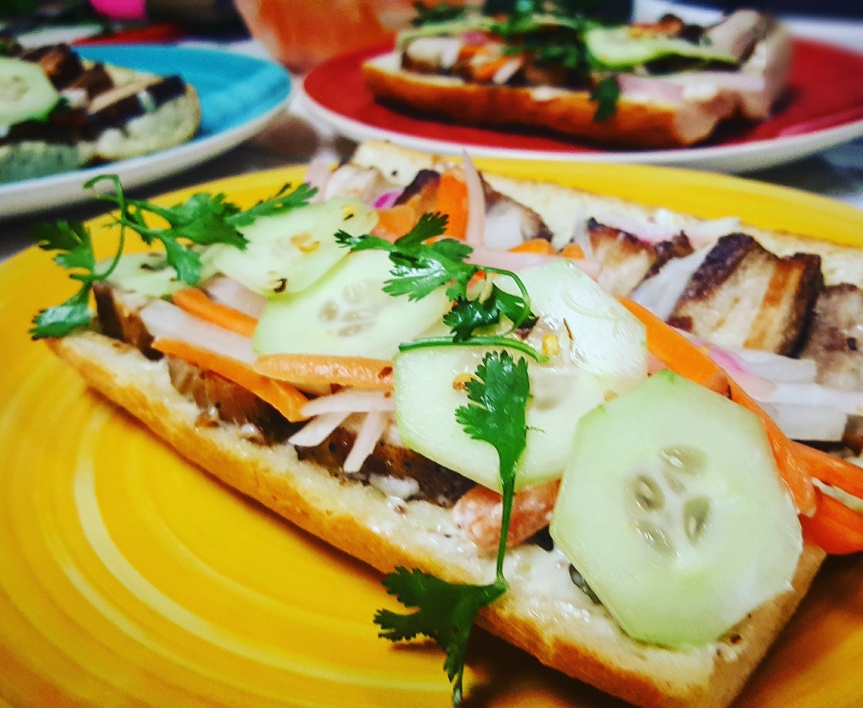
Mexico, with its rich history, may very well be the first place that street food was offered. The pre-Colombian era in Mexico saw food vendors outside of the pyramids serving up some tacos. I love street food, from anywhere in the world, but there is something really special and absolutely delicious about street tacos. And Kaia doesn’t currently have a weird complex about street tacos so we decided to make homemade tortillas and carnitas tacos!
I scooped Kaia from school yesterday and we headed over to Ralphs Grocery Store. Here is what we picked up:
- 5lbs. Bone-in Pork shoulder – This was on sale at 50% off – $11.08
- 2 Jalapeno’s – 1 of these was quartered and added to the meat for a little zip, the other is for some added zip to the salsa – $0.32
- 3lb. bag of Maza Harina – This was also on sale for $2.99
- 6 Tomatillo Chiles – To be used for a traditional green salsa – $1.67
- 1 White onion – For the salsa – $2.15

I haven’t made homemade tortillas in a long time so it’s was kind of a crapshoot how they would turn out. I’m trying to teach Kaia that the more we try new things, the better we will get (if not the first time we try something, we can only stand to improve on that experience, right?). I realize that’s a DUH sort of statement, but it couldn’t be more true. Spending this time teaching, working and learning with my daughter is the best thing I think I can do with my time.
We strive to share these moments with you. Our hope is that you take and share similar experiences with your loved ones.
When we got home, we each had some work to do. Kaia had her actual homework and I got to work on breaking down the protein. I also had her do some additional homework to learn more about Cinco de Mayo. It’s really important to me that she continue to be hungry for information and continues to educated herself.
I’m trying to show her that fact checking is important. Not everything you are told or read is wrong, but being sure that it’s right is always a good idea. You don’t want to be the person that has to backtrack on something you said. Just ask anyone that knows me, I’ve never been wrong. ; )
I know this blog is going to post on Cinco, but today is actually the 4th (Cuatro) de Mayo and we are prepping our food for tomorrow. You will be reading this on the 5th…Oh boy, now I’m confused! Let’s just go with it. You try to keep up and so will I.
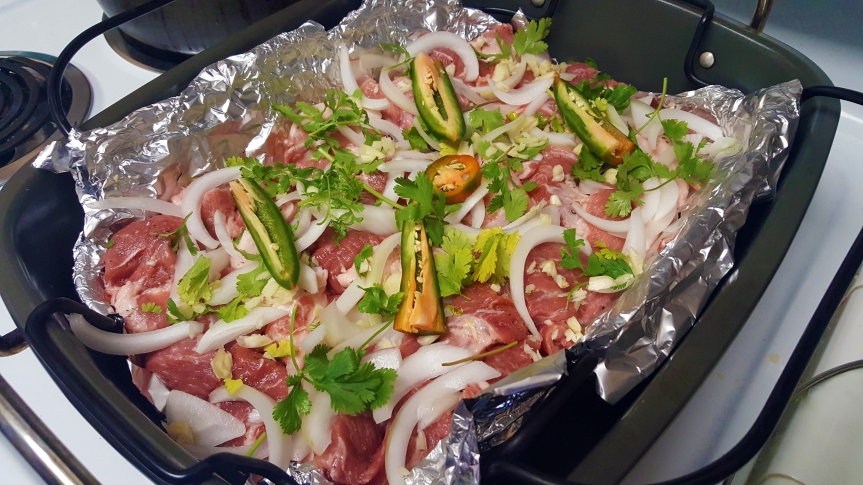
While Kaia studied, I removed the bone from the pork shoulder (if you ever hear it called pork butt, it is the same thing. “Pork Butt” from the proper name “Boston Butt” is cut from the shoulder). I was technically butchering, but this word usually scares people off. It’s not scary at all, it only took about 30 seconds to get the bone out. Then I cut the meat into roughly 2-inch cubes.
- Get your tools setup: you’ll need a pan with a rack. (to make clean-up easier, line the pan with aluminum foil).
- Preheat oven to 350 degrees
- Season the meat generously with salt and pepper
- Cut a quarter of the white onion into long strips
- Quarter one of the jalapenos. If you want spicier, keep the seeds. Less spicy, cut the seeds out.
- Place the pork onto the rack and top with onion and jalapeno
- Add about a cup of water to the pan below the rack (if you have some liquid smoke I would add some as well. It is not necessary, but it adds a nice element to the meat.)
- Cover the whole pan with aluminum foil and place into the oven for 2 hours
- Remove the foil cover and take the rack out of the pan, leaving the meat by itself in its own juices with the onion and jalapeno
- Raise the temperature in the oven to 400 and place the pan back in there for an hour
- Once finished, pull the pork apart (it should just come apart) and put into a bowl to refrigerate until tomorrow… you can do this and eat the same day.

Kaia packed her homemade tortillas and carnitas to take for lunch today. I plan to make mine for lunch right after I send out this blog post.
We hope you enjoy your Cinco celebration as much as we’ll be enjoying our carnitas tacos and homemade tortillas today!